
For most people, keeping chickens is more than the convenience of having fresh free-range eggs delivered daily for free. Having chickens can be a step towards a more self-sufficient lifestyle, a generally healthier diet and a greater connection with nature.
Many people think of their chickens as pets and develop a close attachment to the birds. Don’t forget that, like any pet, chickens can suffer from illness, so make sure you have them regularly checked by a vet.
Looking after your chickens shouldn’t be that taxing but the one thing they definitely need is a suitable hen house. If your DIY skills are passable, this can be an enjoyable weekend project that all the family can help with. Here’s how to go about it.
Coops are normally built with an enclosed area where the chickens can roost at night and lay their eggs in the morning, and an open space called the ‘run’, where they can scratch around in the soil. The enclosed area should provide direct access to the run, but should be around two-foot high, so as to allow room to collect chicken droppings that fall through the floor.
We’ll be working with this design:
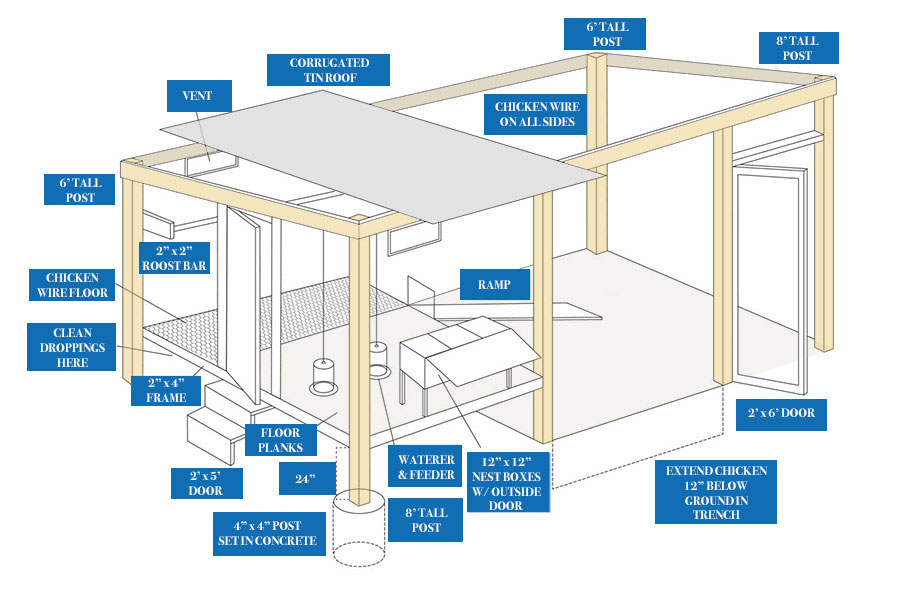
Click the image to enlarge
Building the Frame
- It’s a good idea to use treated timber. Choose the size of your chicken coop (e.g. 4×8 foot, 6×12 foot or 8×16 foot), then set four 4×4 posts in concrete to form the corner posts of the coop. The front posts should be 8 foot and the rear 6 foot high so that a pitched roof can be built over the enclosed part of the coop.
- Put another 4×4 post in the ground about 2 foot from the right front corner. This post will be used to support a small gate so you can get into the run. It should also be 8 foot high.
- Screw a piece of 2×4 timber, horizontally, at a height of 6 foot, between the posts in the right front corner of the chicken run.
- Make a frame for the gate using 2×2 timber and attach it to the corner of the post with hinges.
- To support the frame of the enclosed section, you now need to add two parallel 4×4 posts at about a third of the distance from the left hand side of the rectangle. (i.e. If your coop is 12-foot wide, the posts must be put 4 foot from the left-hand side corner posts.)
- Between the top of each of the posts, fit a frame of 2×4s, horizontally, along the front and rear sides of the coop. To serve as rafters for the enclosed section, add another three 2x4s at an angle between the three pairs of front and rear posts.
- Now fit a frame of 2×4s, horizontally, two foot above the ground, to the 4 posts on the left-hand side of the coop. These provide support for the floor.
- Secure the floor with nails or screws, then fit some planks on top of the 2×4 frame across the front two-thirds of the coop.
- Cover about a third of the back of the floor with chicken wire – this is the area where the chickens will be roosting. The holes in the wire are big enough to allow chicken droppings to fall to the ground.
- Dig a one-foot-deep trench around the outside of the chicken run.
- Stretch and attach the chicken wire vertically to the wooden frame between the posts for the run section as well as horizontally on top. The wire serves as the walls and a ceiling. The chicken wire should be stretched to the bottom of the trench, so that foxes and other predators can’t dig their way in. Re-fill the trench with soil and pack down tightly. The gate frame can also be covered with chicken wire.
Preparing the Interior of the Coop
- Put a blanket of straw on the ground under the enclosed section to collect the chicken droppings and leave a water device in the run so the birds can drink.
- Construct a sloping wooden ramp of about 6 inches wide, from the ground up to the enclosed section so that the chickens can get in and out.
- You’ll also need to make a roosting bar using a section of 2×2 timber. Place this bar close to the back wall over the chicken wire floor.
- Make some wooden laying boxes of approximately 1 foot square (1 box for every 4 birds) and site them along the front wall about 2 foot above the floor.
Note: The roosts should be positioned above the laying boxes – chickens invariably look for the highest point to roost at night. If they roost in the boxes they become soiled with droppings.
For the enclosed section, you can use tin for the roof and wood for the walls – extra 2×4 framing will be necessary.
The Three Sides
- Build a one-foot by one-foot door for the chickens to enter via the ramp.
- Construct some hatches of 1 foot x 1 foot along the front to make collecting the eggs easy.
- Build a 2×5 foot door on the left wall so the chickens can get to water.
The access door should be built using a 2×2 frame like the entry gate to the chicken run. For ventilation, leave a gap between the top of the walls and the eaves.
Share this article